Categories
Amazon Amazon KDP

How to use Kindle Create to Format your E-Book

If you haven’t done so already download Kindle Create now. Click Here. Once you have downloaded it you should see the icon below and now you are ready to get started.

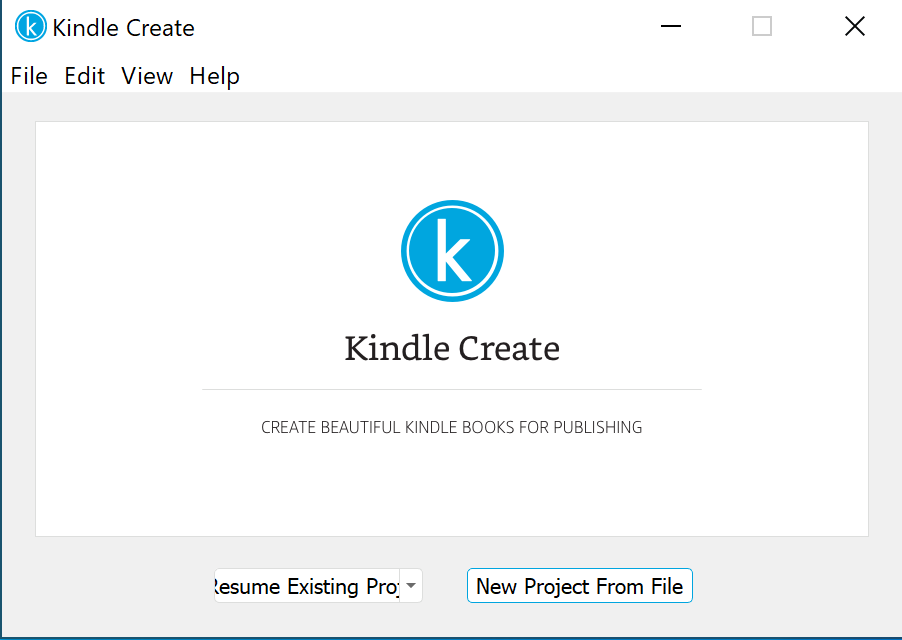
Once you open the program the first screen that will appear will be the one pictured below. This option is pretty easy and straightforward since this is probably your first time exploring the Kindle Create program. Click on “New Project From File”. For the sake of completeness- if you need to get back into an existing book or project you will just need to click on “Resume Existing Project”. 

This next section will be one of your first big choices. What kind of book are you going to publish?

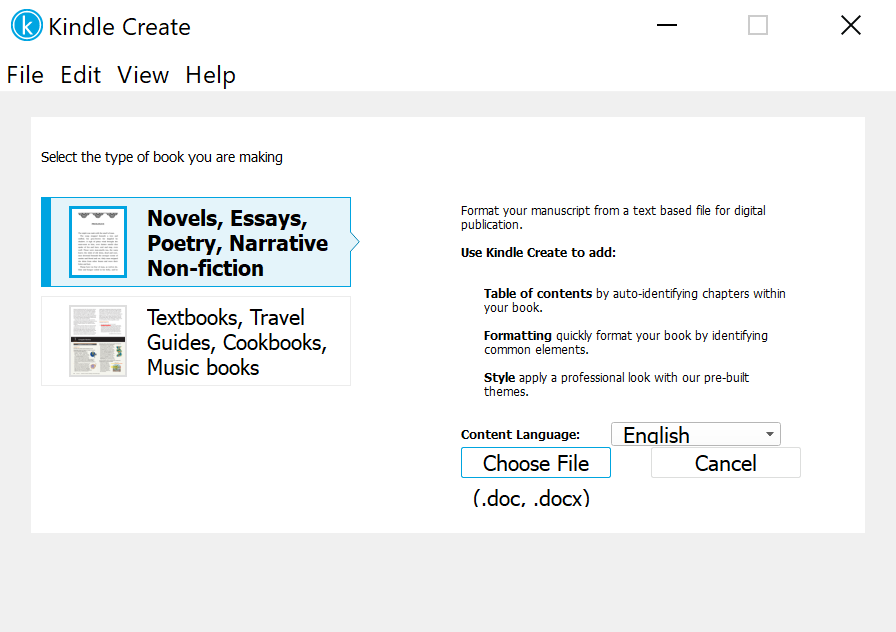
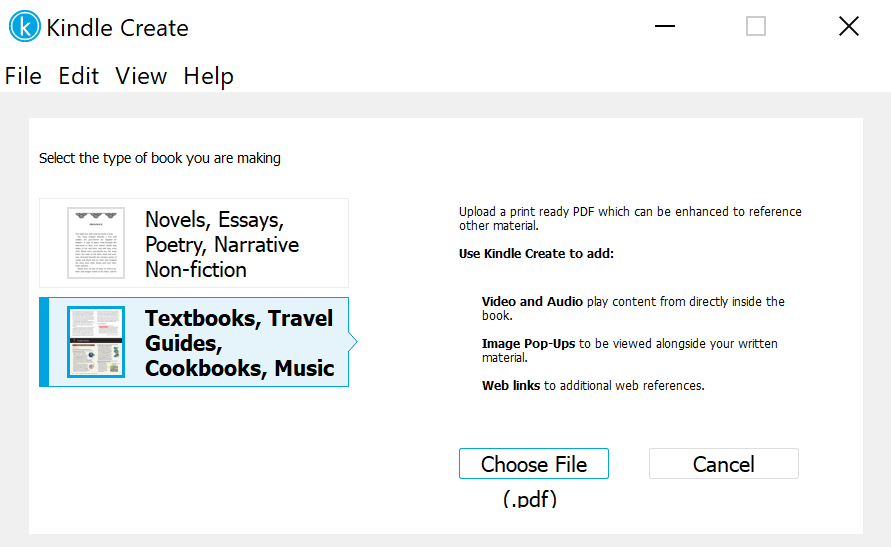
You will notice that, depending on the option that you choose, your original document will need to be in specific original formats (.pdf, .doc or .docx). You may be wondering why there aren’t options for children’s books, comic or manga. Those categories each have their own specific programs supplied by Amazon. If you would like to check them out Click Here

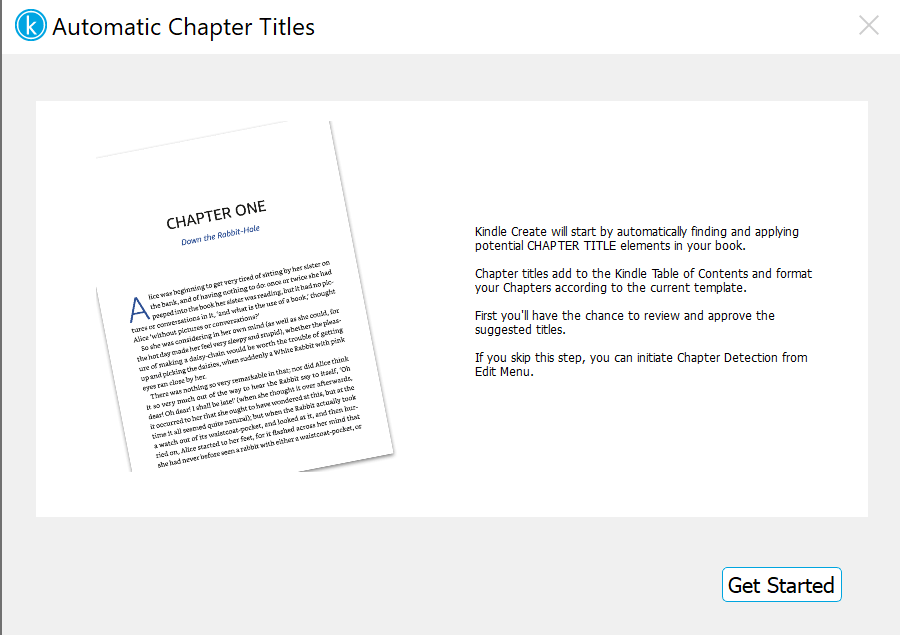
Once you have uploaded your manuscript it is time to actually get started.

Soooo… Click on “Get Started” as seen in the graphic below.

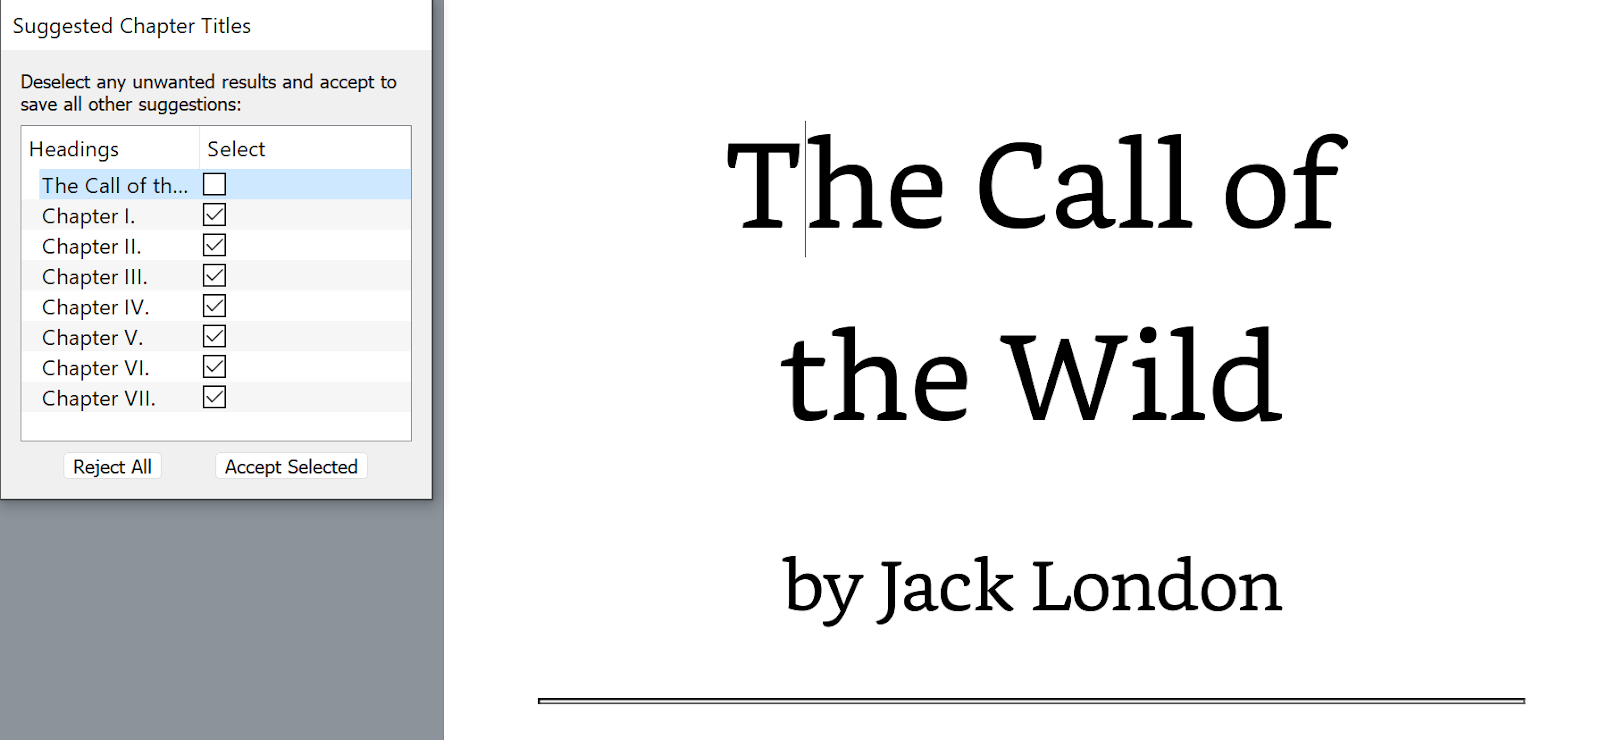
One of the first things that you will notice once the program loads will be the “suggested chapter title” box. This is the easiest way to select or deselect the pre-chosen chapter titles. Pro Tip- This is an easy way to jump between chapters while you are working on formatting your book.

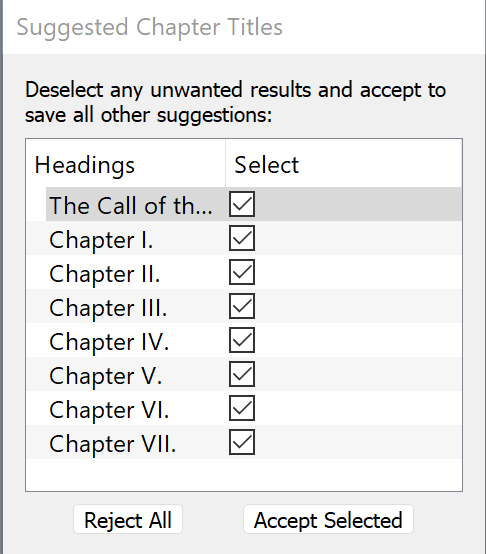
DO NOT press “Accept Selected” until you are sure that all of your chapter titles are listed and your non titles are not listed. If you inadvertently do so you can “fix it” but it is much easier if you accept the chapter titles at the end of the process.

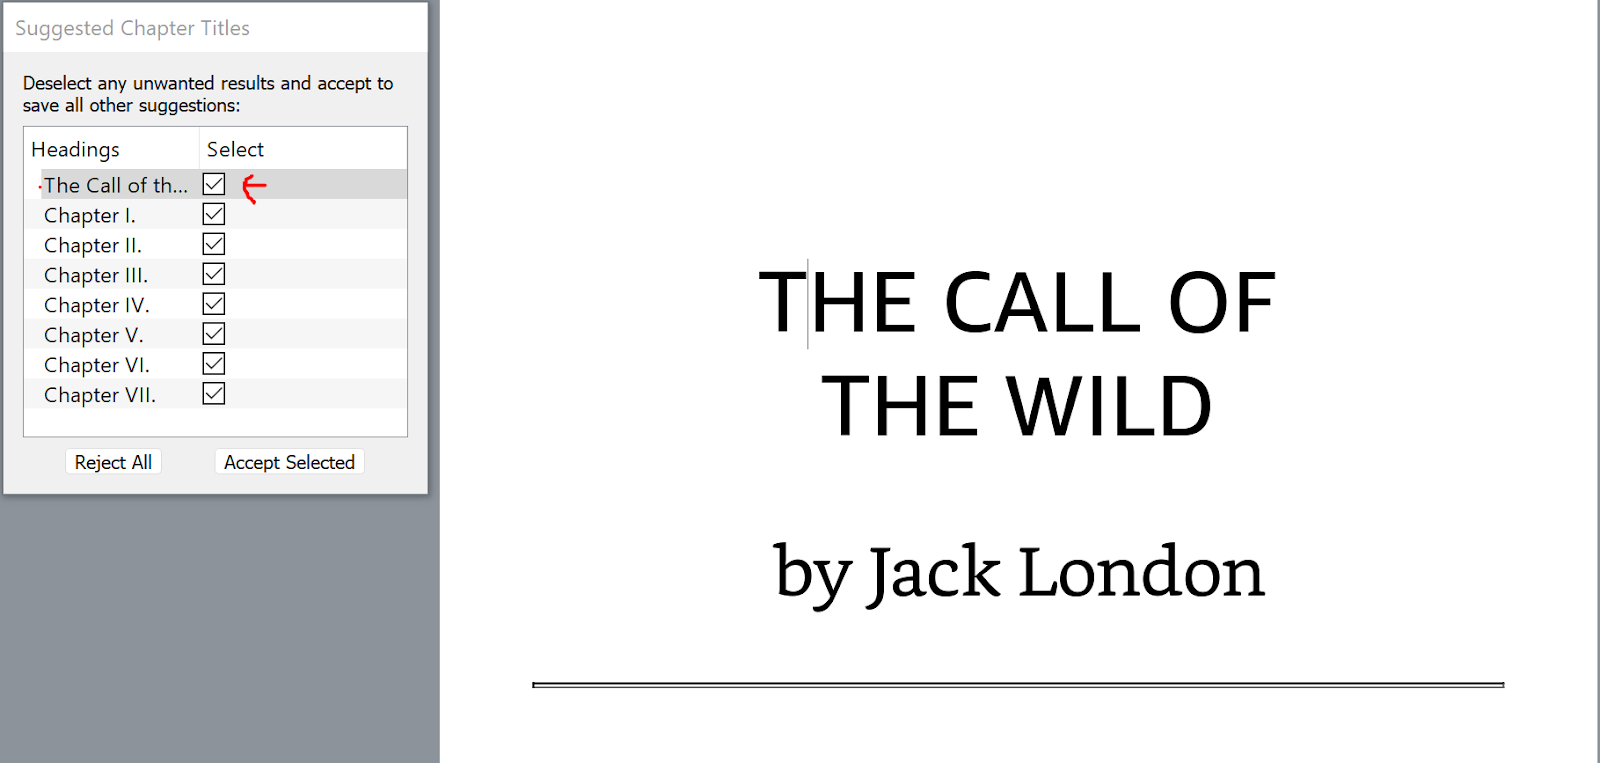
As you can see in the sample shots above and below the fonts of the chapter title will change depending on if you have it selected as a chapter title or not. If you have a page start selected as a chapter title it will automatically be changed to the format of the chapter title that you have selected.

There are two main areas that will help you to edit, adjust and format your book. We will split them between the left and right hand side. The left side deals primarily with the content of your book. The right hand side deals primarily with how your book will look when it is formatted.

Left Hand Side

In the next three sections we will be going through the frontmatter, body and back matter options available in Kindle Create. None of these options are mandatory to choose to have in your book. 

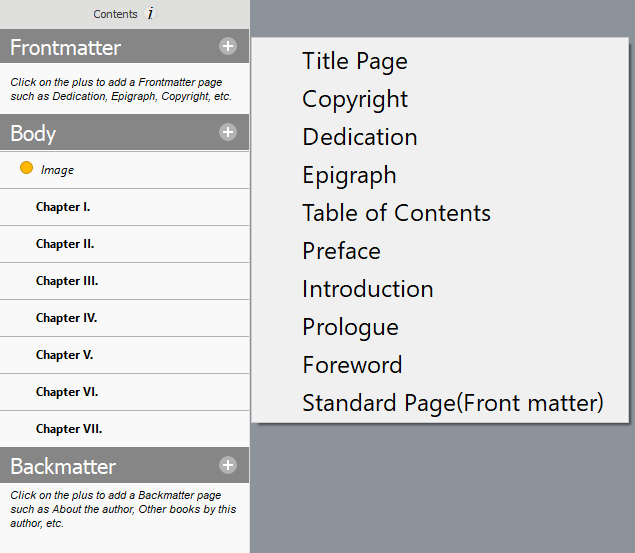
Under the front matter tab you will have access to 10 different parts of a standard book. You don’t have to use every or even any of them but they are there for you to use if you choose to do so. If, like me, you aren’t a literary professional you might not even know exactly what some of these options are. That being said; see below for definitions of each option.

Title Page- The title page of a book, thesis or other written work is the page at or near the front which displays its title, subtitle, author, publisher, and edition.

Copyright- The copyright is the right to copy a work. Copyright prevents bookstores from buying one book from the author, making copies and then selling them to its customers. The customers are not just buying the book; they are buying the author’s intellectual property: the story, the characters and the setting.

Dedication- A book dedication is a way for authors to bestow a high honor on a person (or small group of people) they want to praise or otherwise spotlight. The dedication usually goes on the dedication page, which is in the very front of the book, after the Title page.

Epigraph- An epigraph is a quote, paragraph, or short excerpt typically found at the beginning of a book.

Table of Contents- A table of contents page lists out what the book includes. This can be section topics, chapter titles, and discussions. In fiction (novels), the table of contents lists the chapter titles and the pages they’re found on.

Preface- A preface is an introductory passage written about a book by its author. The preface presents the opportunity to introduce yourself, the book, and any previous projects or experiences that might have informed it. Prefaces are your chance to tell the book’s story — the story of how it went from a thought in your head to a book in our hands.

Introduction- An introduction (also known as a prolegomenon) is a beginning section which states the purpose and goals of the following writing. 

Prologue- A prologue is used to give readers extra information that advances the plot. Authors use them for various purposes, including things like giving background information about the story.

Foreward- A foreword is a piece of writing that serves to introduce the reader to the author and the book, usually written by someone who is not the author or an editor of the book. Forewords can also serve as a sort of endorsement for the book.

Standard Page (Front Matter)- This page generally just has the title of the book in plain text on it.

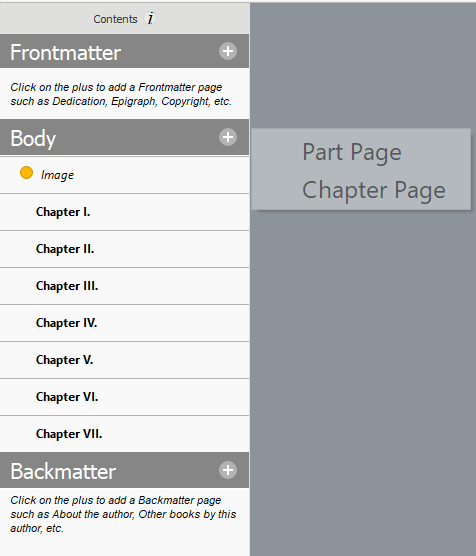
As you can see above there are two options available in the “Body” section. 

Part Page- This is how you will most easily be able to add parts to your book. As in “Part 1”, “Part 2”… ect. There are other ways to add “parts” into your book but this is by far the easiest way.

Chapter Page- As with the “part page” option this is the easiest way to add a chapter into your book should you have forgotten to add it into the original manuscript upload or if you decide to update your book post publication.

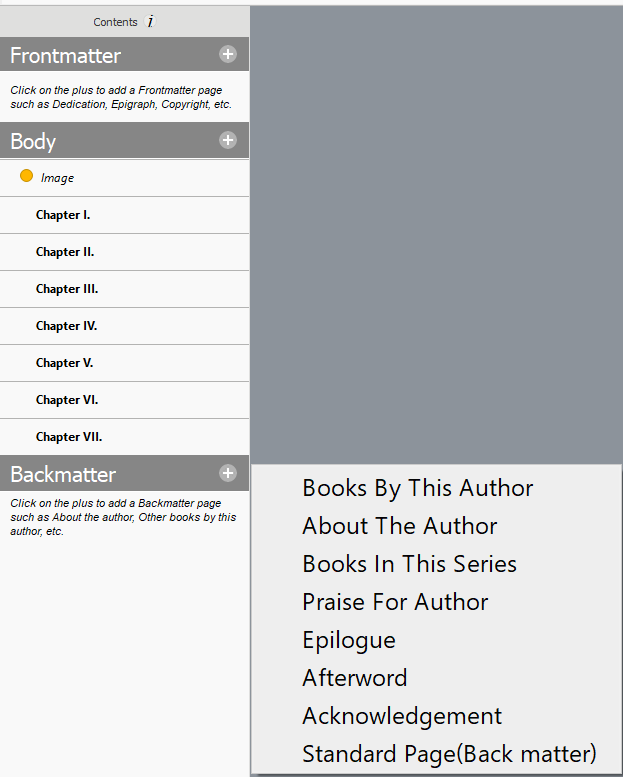
Books By This Author- This option is a great way to let the readers know about other books that you may have available for them to read. Pro Tip- You can always go back and update prior published manuscripts with more “books by this author”.

About The Author- Here is where you can tell your reader a little about yourself.

Books In This Series- Is this book part of a series? If so, this is where you get to tell your readers. Pro Tip- Just like the “books by this author” section you can go back and add this to your original manuscript if you decide to expand on your book and make it the first in a series of books.

Praise For Author- This is where you get to “toot your own horn” so to say. If you have received accolades or letters of endorsements this is where you should tell your readers about them.

Epilogue- This is the final chapter at the end of a story that often serves to reveal the fates of the characters. Some epilogues may feature scenes only tangentially related to the subject of the story. They can be used to hint at a sequel or wrap up all the loose ends.

Afterword- It generally covers the story of how the book came into being, or of how the idea for the book was developed.

Acknowledgement- The book acknowledgments section is where you recognize and thank everyone who helped you with your book. It’s a way to display your appreciation to them in a public and permanent forum

Standard Page (Back Matter)- When this option is chosen it is often the same as the standard page (front matter). It is normally just the title of the book in plain text.

Right Hand Side

Now for the options on the right hand side of the page. This is the side of the page that you will decide how your book and elements therein will look.

The checkbox at the top of this section “Cascade formatting changes for elements” will allow your changes to affect or not affect all of the applicable sections within your book. 
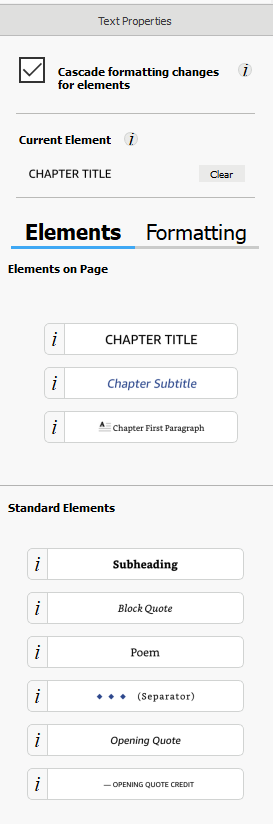
~Elements on Page~

Chapter Title/ Chapter Subtitles- This is where you can add chapter titles and subtitles (these will also show up in the floating “suggested chapter title” box that we discussed earlier) that did not show up in the suggested section.

Chapter first paragraph- Have you ever noticed how the first letter in each chapter is in some (many?) books are much larger of a type? Well this is where you can quickly and easily make it happen.

~Standard Elements~

Subheading, block quote, poem, *** (separator), opening quote and opening quote credit are the elements available to format in this section. Below are the definitions of the elements available in this section. 

Subheading- A subheading appears at the beginning of a page or section and briefly describes the content that follows.

Block Quote- A block quotation is a direct quotation that is not placed inside quotation marks but instead is set off from the rest of the text by starting it on a new line and indenting it from the left margin.

Poem- This is pretty self explanatory. If you have a poem that is going to be part of your book then select this option. It will automatically format the poem to be centered on your pages and formatted correctly for poems.

*** (Separator)- This is used to add a separation or a change within a chapter.

Opening Quote and Opening Quote Credit- This option is used in conjunction with the Epigraph option discussed above.

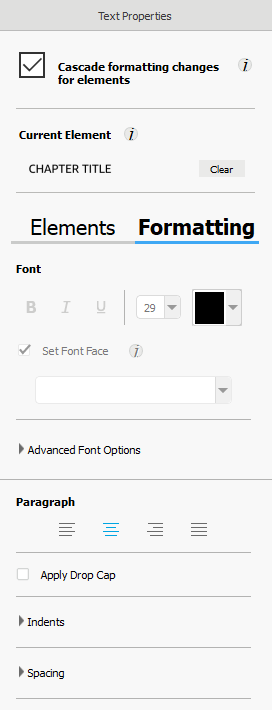
The formatting options (see above) in the right hand section are all of the basic and advanced options that a user of google docs, microsoft word or other such programs will be very familiar with using. As such, and since they are not exclusive to KC, we will not spend much time defining what the various options are for.

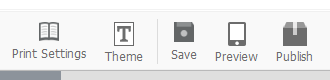
The last set of options/ settings that we will go over are available at the right top of the page (and pictured above).

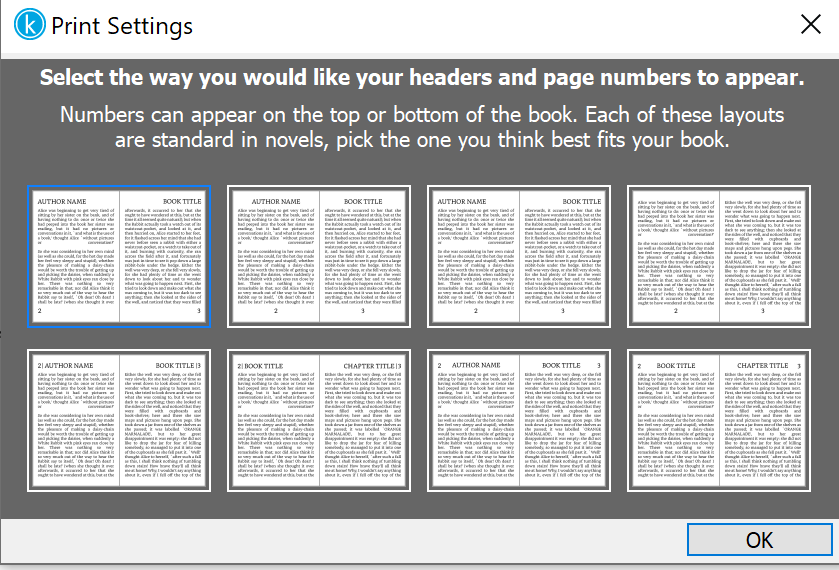
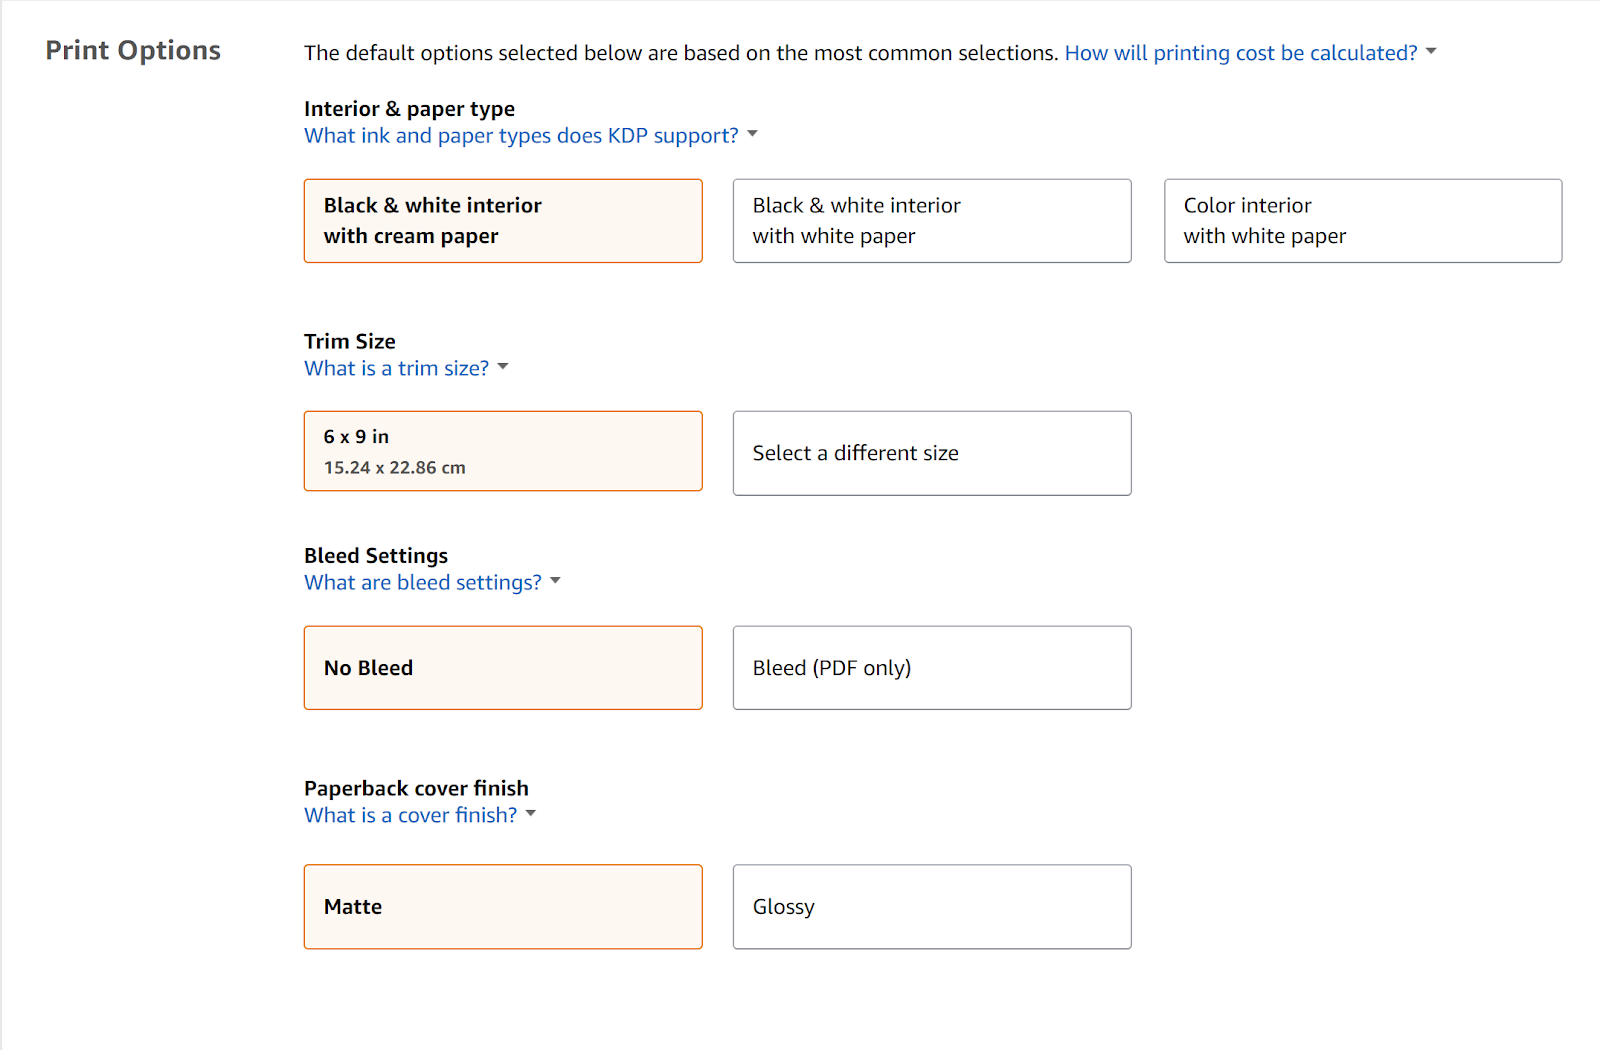
Print Settings- This is where you can choose how your book will look when it is in print.  

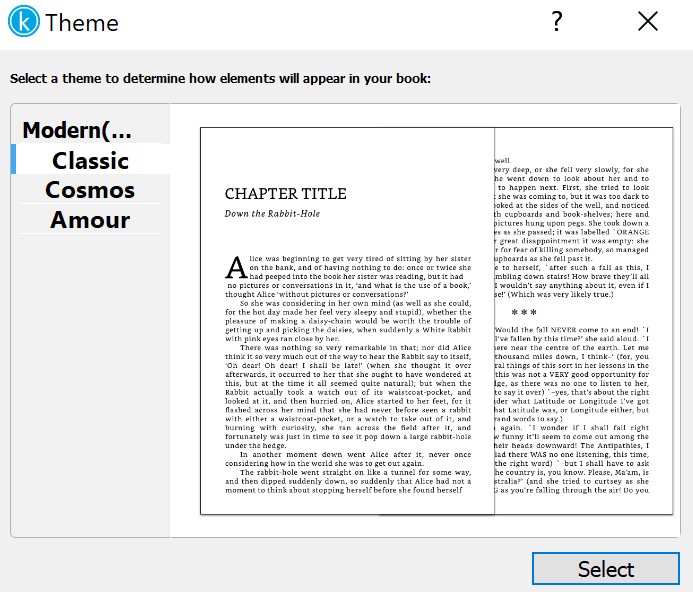
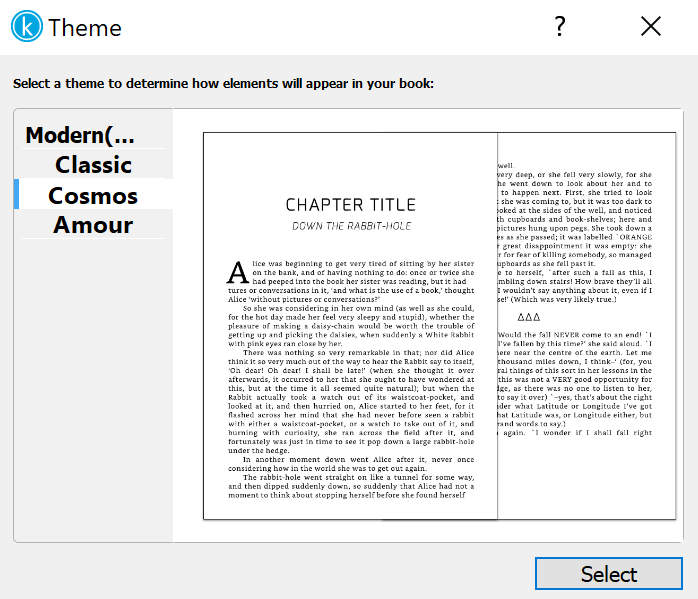
Theme- As seen above the various options of the themes will change the way that your book will look. Different themes are better fits for different kinds of books or subject matter. 

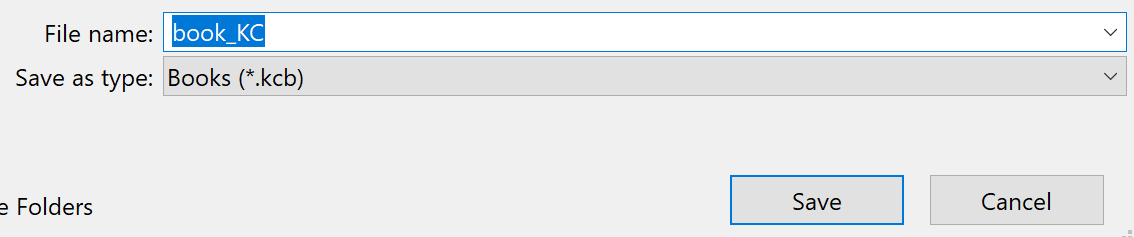
When you click on “save” you will be prompted to save your manuscript to your designated device. It will prompt you to save your manuscript as xxxx_KC with the type .kcb. When you upload your manuscript in to KDP (Kindle Direct Publishing) it will generally need to be in this format or a PDF.

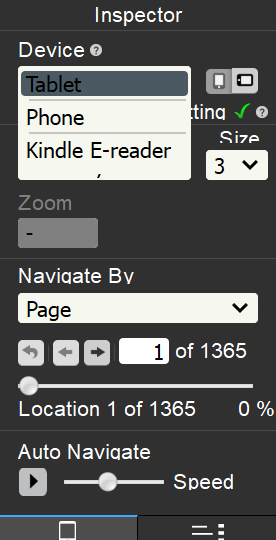
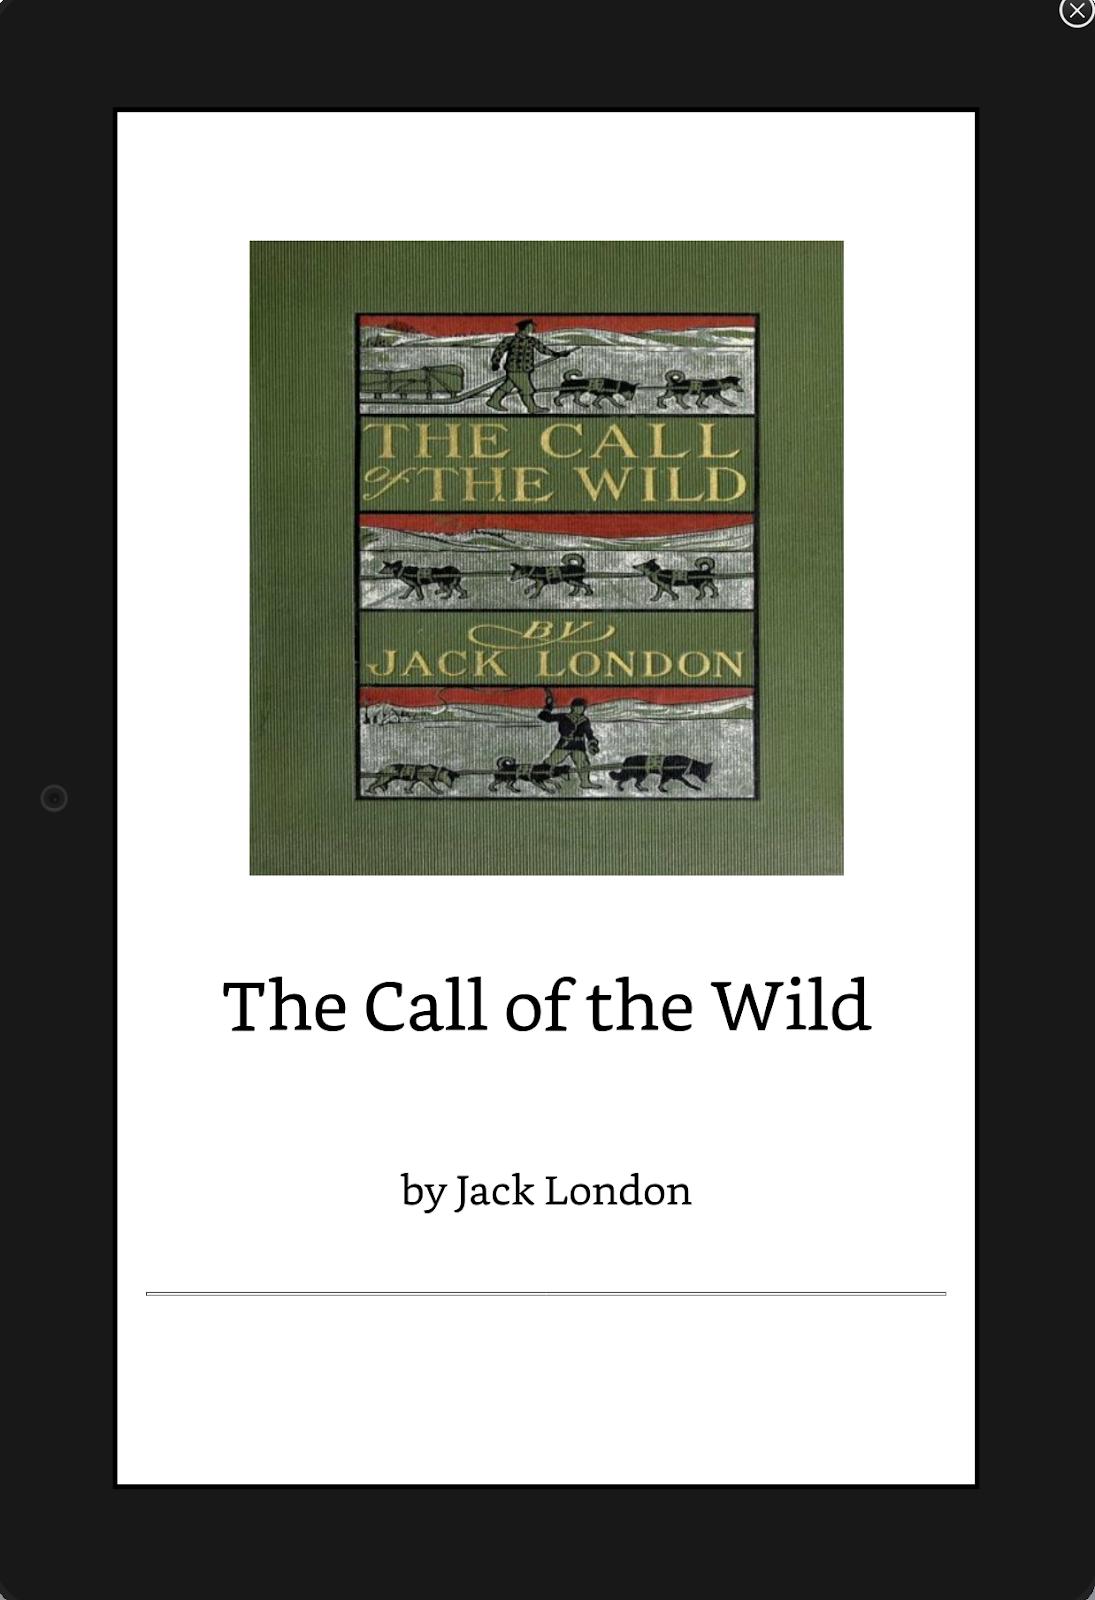
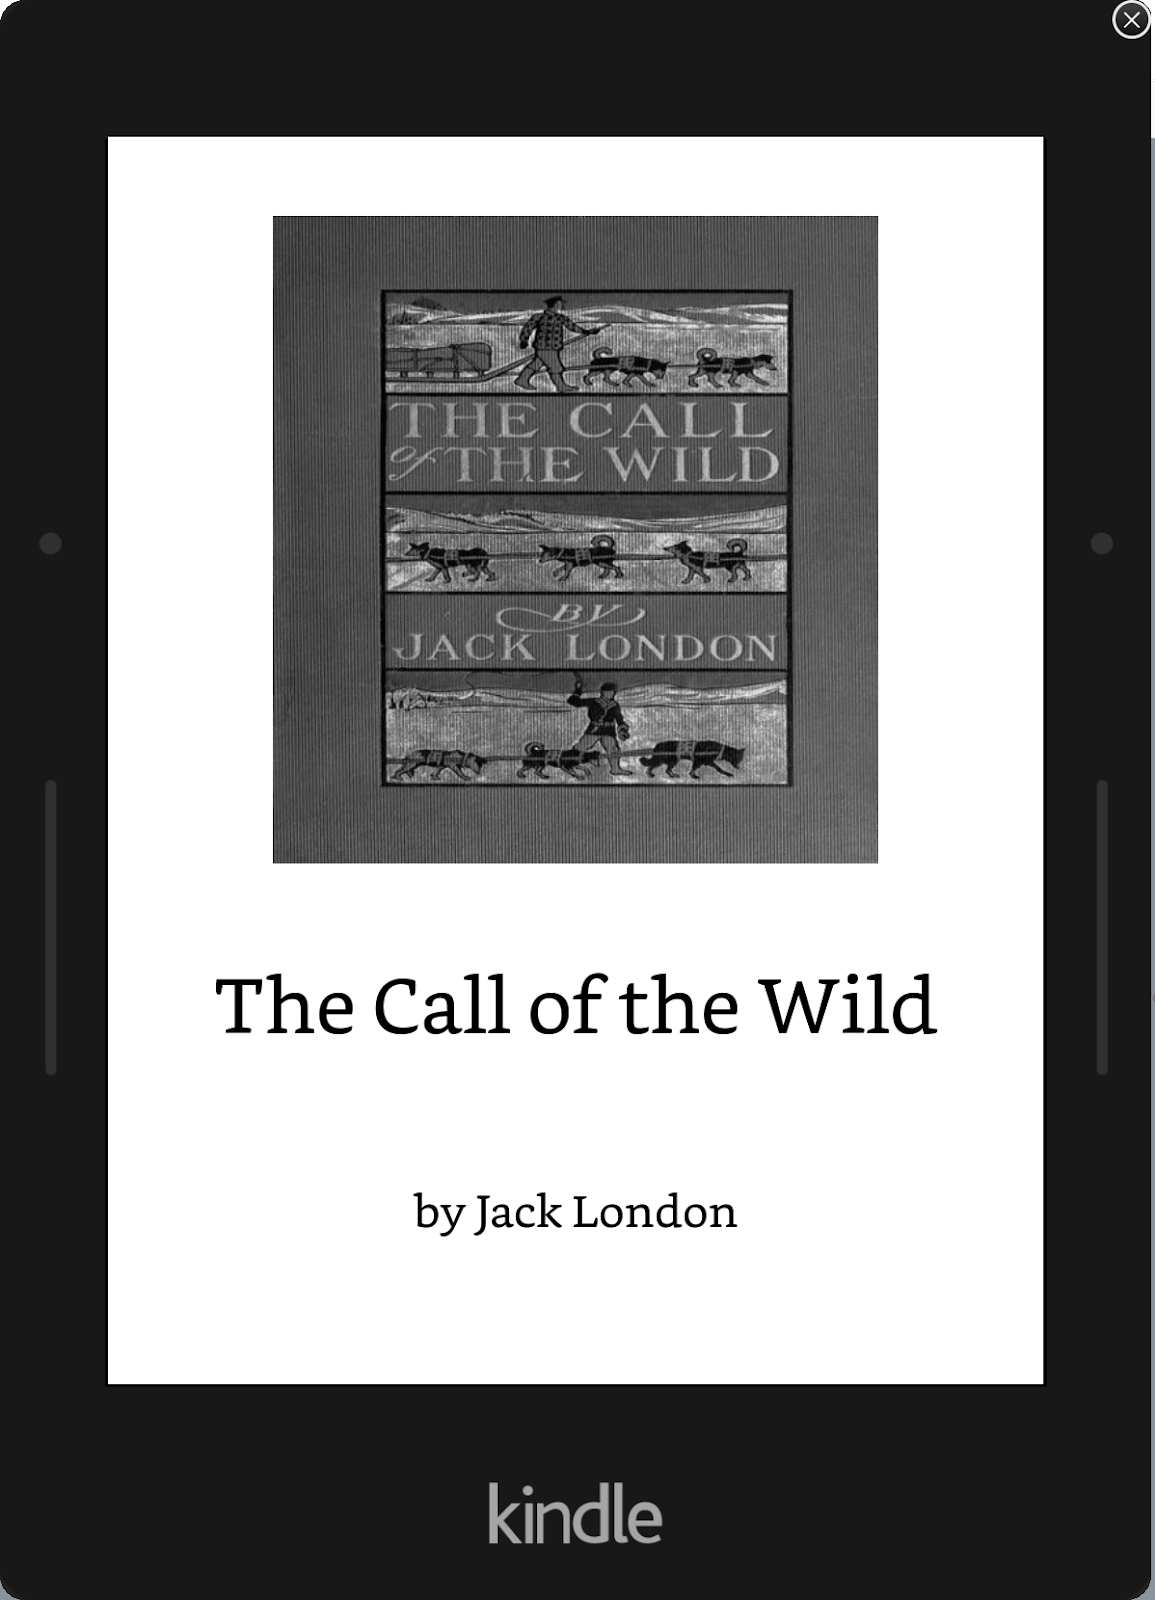
The previewer option will allow you to see how your book will look on a tablet, phone and/ or E-reader. This option is very important to pay close attention to. Just because your manuscript looks correct on your computer screen does not mean that it will look correct on other devices. Take the time to ensure that your book is formatted correctly to read correctly on all available devices.

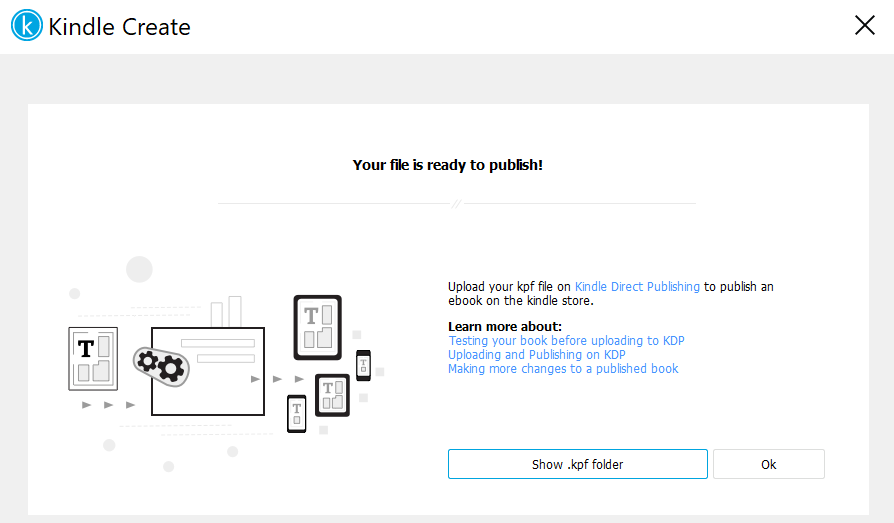
Once you are happy with the way that your manuscript looks you are ready to click publish. This will save your manuscript into a publishable packet for ease of upload into the KDP system.
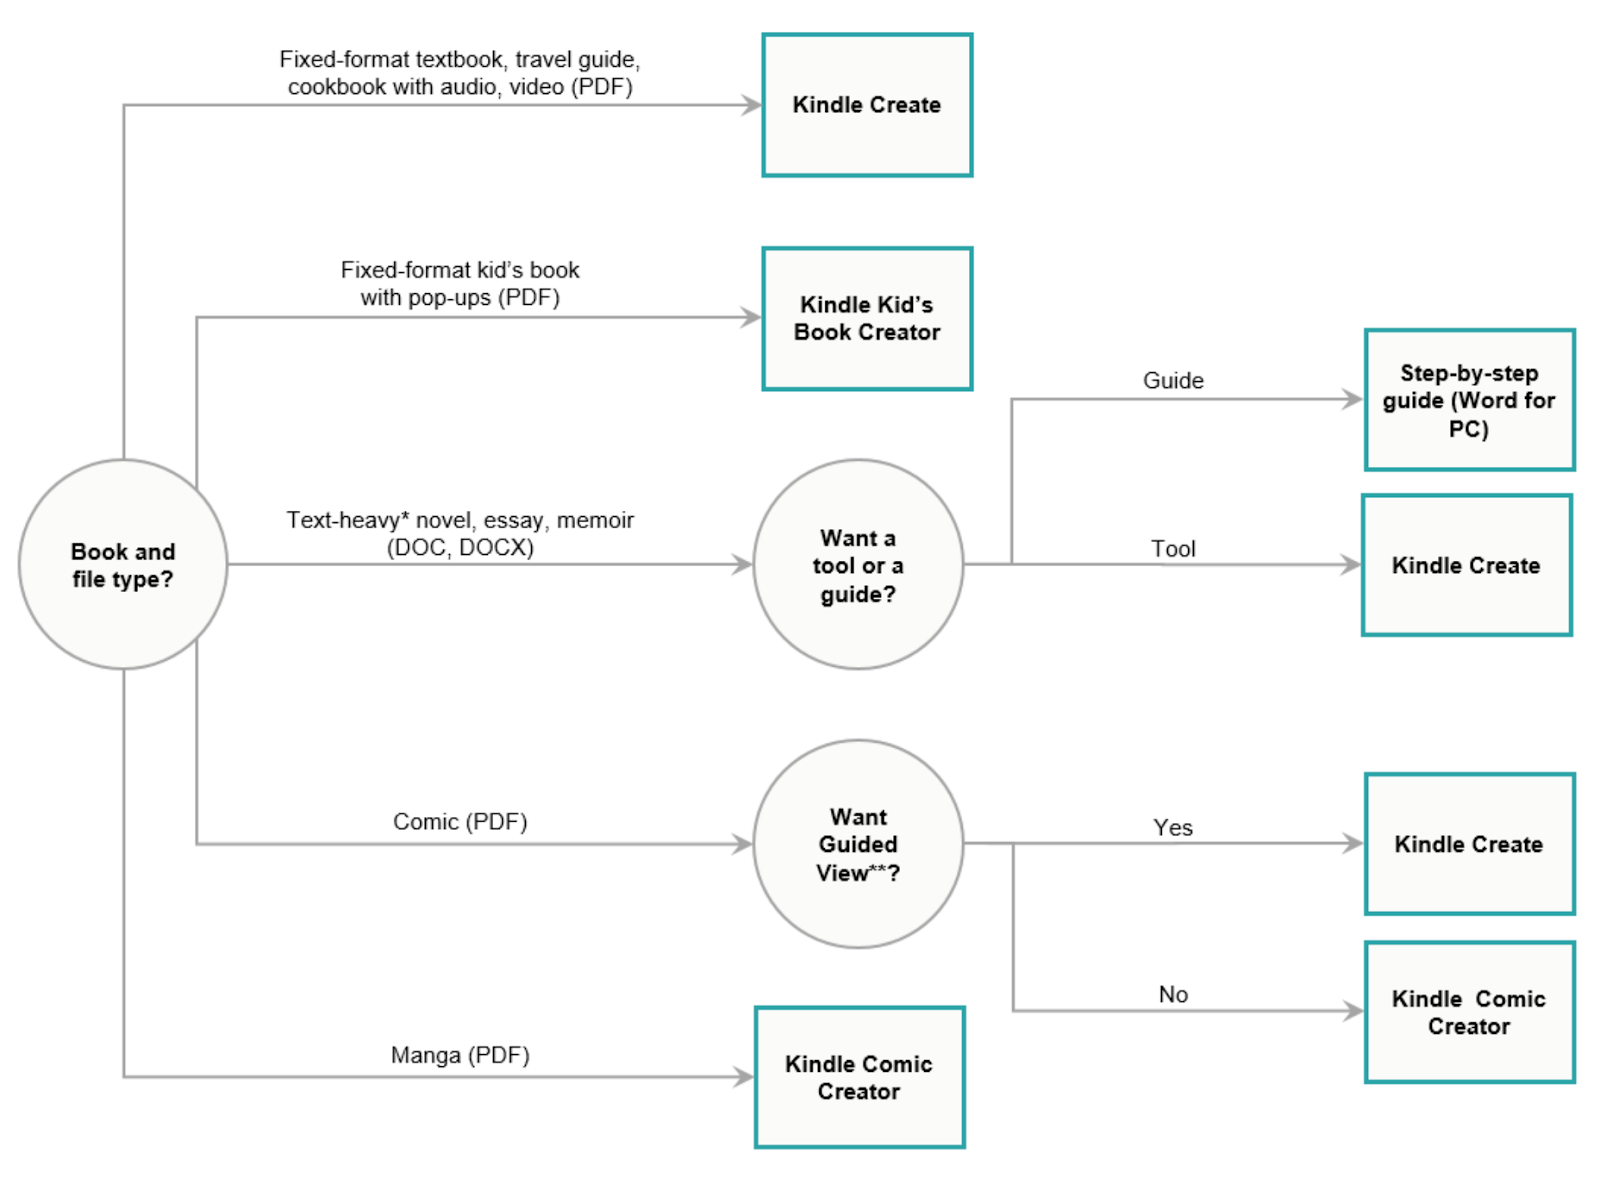
Decision Chart

(This chart will help you to decide which of Amazon’s publishing/ formatting programs that will be a best fit for your book) 

Don’t forget to join our community of amazing like minded people over on our Facebook page. Hop on the Facebook Weirdmoneyco train… CLICK HERE to join! 

Categories
Amazon Amazon KDP

How to Publish a Book on Amazon

Self Publishing on KDP

Publishing Your Paperback on KDP Explained

If you have already read through and followed the steps to publish your ebook version then much of this will look the same. I have made the notes in the differences colored in RED to make it easier to see the differences.

Here is a  full breakdown of the steps and explanations thereof to make it easier on you!

                  1                                     2                                        3

Page 1 of 3

Information that you will need to enter- 

Everything on this page will (should?) auto populate if you have already published your ebook.

Title- This is the title of the book that you are going to publish. You will want to make sure that this matches the title of the book in your manuscript that you will be uploading a little later in the next section If it doesn’t it will normally get flagged by the Amazon KDP algorithm.

Author- This is the section that you will need to enter the name of the original author of the book. If you are the original author then your name will go here. If you are publishing an open domain book then the name of the author will go here.

Is it part of a series?– This is one of the few “optional” sections that you can choose to fill out. If your book is part of a series or you think it might be part of one eventually this is where you will put the name. Just like most parts of KDP you can go back and edit it even after it is in “publication”. I prefer to sort my books into series (i.e. childrens books, cookbooks, fairy tales, ect.) mostly for my benefit but there is also a benefit for the sales of your books in that series. If you have ever looked at a book for sale on Amazon and seen the next few books in that series suggested to you this is where that “suggestion” comes from.

Edition- Is the book a specific edition? If so this is where you will make the customers aware.

Book Descriptions- This may seem frivolous or something that is not super important but that couldn’t be further from the truth. How will you be able to differentiate yourself from the other versions of your book that are already listed? This is the first way for you to do so! Also, this will help your book to more easily be found by potential customers as they search. 

Keywords- As with the section above, the keywords that you use will assist your book in being found by future customers. Research what keywords are best for your book. Treat this just as you would researching keywords for an optimized blog post. You can have up to 8 keywords listed per book. 

Categories- Pick the category(ies) that your book best fits into. Up to two of them. Amazon will also classify your book into other “suggested” categories or sections as you begin to sell your books.

Age range (if needed)- Should there be a minimum age for the subject matter in your book? This is primarily opinion based.

Page 2 of 3

Information that you will need to enter- 

The second page of KDP is vastly different from the ebook version.

Print ISBN- If you already have an ISBN this is where you will enter it. If you don’t have an ISBN you can choose to have Amazon assign you a free ISBN that is exclusive to printing your book on Amazon. What is an ISBN? What does the ISBN Number mean? See the chart below.

Note: If you want your own ISBN so that you can sell physical copies of your book not on amazon you will need to purchase one. Most commonly from Bowker.com.

Publication Date- The graphic below probably explains it the best but, Amazon will use your “Live on Amazon” date.

Print Options-  You can choose between lots of different physical options for your book in this section. For the vast majority of books that you will publish the “default” option will be the cheapest. Your choices here will be the biggest determining factor of the “cost” of your book. The cost of your book is deducted from the sale of your book so there is no upfront cost to you. 

Manuscript upload- This is a very important section to “get right” in both ebook and paperback versions but even more so in paperback since the return of a physical copy could cost you. As I stated before, do yourself a favor and download the Kindle Create program. If you already have your manuscript preformatted in a PDF file you can upload it without using the Kindle Create program. Pro Tip: If you are interested in printing blank journals save a PDF copy of the lined pages so you can reuse it for other journals.  

If you want to learn how to use Kindle Create to format your manuscript CLICK HERE.

Cover creator- This is a pretty intuitive program to use within the publishing program on KDP. This is probably one of the biggest differences between publishing ebooks and paperbacks on KDP. In this version of KDP you will need to decide what picture that you want to use for your cover art. In the paperback version, the picture will need to be at least 300 DPI (or adjusted to be 300 DPI). As seen below you can choose a picture of your own or a stock photo supplied by KDP. This is also where you will need to enter in a description, a picture of the author, a short bio of the author and a back cover picture. As with the front cover all pictures will need to be at least 300 DPI.

eBook Previewer- This is your final check to ensure that your book is formatted correctly and everything looks right. Page through this section carefully to ensure that the formatting is correct for your paperback version.

Page 3 of 3

Information that you will need to decide and enter- 

Enter into KDP Select?- This is only available for Ebook versions for obvious reasons.

What territories to sell in (worldwide or individual)?- You are able to select worldwide or in certain territories. In my opinion, it makes little sense to limit your ability to sell by limiting your markets but… to     each their own.

 If you decide to sell worldwide your minimum cost per book will be much higher but you will have a much larger audience so you will need to weigh the decision between the added cost of your book (possibly fewer sales due to price) and the added distribution area (much larger possible audience). 

Price-  This section is an interesting section to dig into. The pricing of your book can dramatically affect the sales of your book. There are also some Amazon set constraints. In most cases your book can not be set as “free” (although there are ways around this).  If you are publishing your own original content/ journal or low content book you will need to decide at what price it will sell the best. The easiest way to do this is just with some super simple “market research”. As in, search for “like” offerings on Amazon and see what they are selling for. As with almost everything else in KDP you can go back and change it after your book is approved so don’t stress too much over this.

The print price from your paperback and Amazon’s cut are automatically calculated and displayed. The minimum price will be much higher if you choose to offer your book in all available markets.

Book Previewer- You will need to preview your book from cover to cover to make sure that everything is formatted correctly and your cover looks correct.

At this point your book is ready to publish! All you have to do is click on the publish button. Once you have clicked “publish”, just go back to your “Bookshelf”. See below for the visual!

At this point all you are doing is waiting. Your book will initially be “In Review”. It can take up to 72 hours, on average, for your new ebook to go into “Live” status in KDP. There is a step in between “In Review” and “Live” and it is “Publishing”. This step generally takes just a few hours at most and unless you are constantly checking in on it you will normally not even see this step. Your book is ready for people to purchase once it is in the “Live” stage.

Pro Tip: Amazon will automatically “link” your paperback and ebook. This is one of the main reasons that I generally publish a paperback version of my ebooks. Amazon will show the price difference between the ebook and the paperback as a % discount and this will entice readers to buy your book.

Don’t forget to join our community of amazing like minded people over on our Facebook page. Hop on the Facebook Weirdmoneyco train… CLICK HERE to join! 

Categories
Amazon Amazon KDP

The Complete Guide to Publishing an E-Book on Amazon

Self Publishing on KDP

First let me tell you a little story (masked as a bonus “how to” for publishing open domain books).

If you are interested in learning how to publish an open domain book start here; (if you are publishing your own original work skip down to the next chapter; “Publishing your eBook on KDP explained”)….

Any works that are in the public domain are able to be published on Amazon (among other e-publishing companies) by anyone that wants to take the time to do so. 

There are various websites that have digitized printed works that are in the public domain and are able to be downloaded. One of the biggest and most complete sites is Project Gutenberg. They have over 60,000 books available in many forms. 

Most, if not all, of the e-publishing companies require you to differentiate your version of the book by various means from the original if it is offered for free elsewhere . The standard means of differentiation are one of three- Illustration, annotation or translation. When you see a book in print that says one of these three things after the title there is a good chance that it is a public domain work. The dictionary defines annotation as “to add notes to (a text or diagram) giving explanation or comment”. Amazon defines annotation as “a unique, hand-crafted additional content including study guides, literary critiques, detailed biographies, or detailed historical context”. Illustration is defined as “a picture illustrating a book, newspaper, etc.” in the dictionary and is defined by Amazon as that “it includes 10 or more unique illustrations relevant to the book”. Translation is defined in the dictionary as “the process of translating words or text from one language into another language” and as “a unique translation” by the almighty Amazon.  Since I am not a translator by any definition of term this option was out for me currently. That leaves illustrating and annotating as my options for differentiating the open domain works from the ones that are available for free.

Once I figured out this bit of information I decided to start downloading a bunch of books that I thought were interesting, ones that I had read before or ones that I thought would sell well.

I downloaded them (10 of them!) into Google docs and formatted them so they looked great to me. I made sure that they had all the applicable annotations and/ or illustrations to fit the open domain guidelines. Next I signed up for KDP (Kindle Direct Publishing). From this point, I was on my way and was able to quickly set up my account. While I was going through the process of setting up my first book to be ready for sale, I uploaded my first manuscript and designed my cover (super excited at this point!). At the bottom of that page (the second page) you have to preview the e-book. This is where my troubles began…

The formatting was, for lack of a more flattering term, a complete trainwreck. There were chapters starting in the middle of pages. The illustrations were not where they were supposed to be (some times at the top, in the middle, or at the bottom) and as far as I could tell they ended up wherever they wanted like they had a mind of their own. 

Ugh!!!… Back to the drawing board to figure out how to make this work…Time to read and do some more research!

I probably should have done more of this before jumping into it before I understood all of the program intricacies but in my defense I was super excited.

This is where I came across Kindle Create. This is a free program that is offered by Amazon and it is amazing! It does take a little bit of “getting to know” the program. I am not a “tech person” whatsoever, so if I can learn this program fairly quickly then pretty much anyone should be able to do so in short order. 

Back to publishing my first book!…

Now that my first book has been formatted, correctly this time, it was time to go back to trying to publish it. 

Publishing your eBook on KDP explained

Here is a  full breakdown of the steps and explanations thereof to make it easier on you!

                  1                                     2                                        3

Page 1 of 3 – This is all about the details of your book

Information that you will need to enter- 

Title- This is the title of the book that you are going to publish. You will want to make sure that this matches the title of the book in your manuscript that you will be uploading a little later in the next section If it doesn’t it will normally get flagged by the Amazon KDP algorithm.

Author- This is the section that you will need to enter the name of the original author of the book. If you are the original author then your name will go here. If you are publishing an open domain book then the name of the author will go here.

Is it part of a series?– This is one of the few “optional” sections that you can choose to fill out. If your book is part of a series or you think it might be part of one eventually this is where you will put the name. Just like most parts of KDP you can go back and edit it even after it is in “publication”. I prefer to sort my books into series (i.e. childrens books, cookbooks, fairy tales, ect.) mostly for my benefit but there is also a benefit for the sales of your books in that series. If you have ever looked at a book for sale on Amazon and seen the next few books in that series suggested to you this is where that “suggestion” comes from.

Edition- Is the book a specific edition? If so this is where you will make the customers aware.

Book Descriptions- This may seem frivolous or something that is not super important but that couldn’t be further from the truth. How will you be able to differentiate yourself from the other versions of your book that are already listed? This is the first way for you to do so! Also, this will help your book to more easily be found by potential customers as they search. 

Keywords- As with the section above, the keywords that you use will assist your book in being found by future customers. Research what keywords are best for your book. Treat this just as you would researching keywords for an optimized blog post. You can have up to 8 keywords listed per book. 

Categories- Pick the category(ies) that your book best fits into. Up to two of them. Amazon will also classify your book into other “suggested” categories or sections as you begin to sell your books.

Age range (if needed)- Should there be a minimum age for the subject matter in your book? This is primarily opinion based.

Page 2 of 3– This is where you will create/ upload the “meat” of your book

Information that you will need to enter- 

Digital Rights Management (DRM)- According to Amazon it “is intended to inhibit unauthorized access to or copying of digital content files”. (It is, however, not available for open domain books.)

Manuscript upload- This is where I first found out that I had a problem as described above. As I stated before, do yourself a favor and download the Kindle Create program. Link to How to use KC blog post.  If you already have your manuscript preformatted in a PDF file you can upload it without using the Kindle Create program. Pro Tip: If you are interested in printing blank journals save a PDF copy of the lined pages so you can reuse it for other journals.  

Cover creator- This is a pretty intuitive program to use within the publishing program on KDP. A few notes that will make your life easier… The DPI of the pictures in the E version of your book do not matter. You can also have your cover professionally done (or done by you if you are good at that kind of stuff) and just upload it into the cover creator line.   

Note: If you choose to also publish a paperback version of your book the DPI of your picture will need to be 300 or more.

eBook Previewer- This is your final check to ensure that your book is formatted correctly and everything looks right. Make sure to check this section page by page to look for any sort of formatting issues.

Page 3 of 3– Where to sell and how much to sell it for.

Information that you will need to decide and enter- 

Enter into KDP Select?- This  is an interesting way to possibly increase your income from your Ebook. One of the main things to remember is that once you enroll in this program you are also signing an exclusivity contract for a 90 period. You can re enroll at the end of this timeframe or choose to opt out of continuing at that point.  This exclusivity is specifically only for the E version of your book. 

Side Note: KDP select is not available for open domain books. Click Here to be redirected to Amazon’s KDP full explanation page.

What territories to sell in (worldwide or individual)?- You are able to select worldwide or in certain territories. In my opinion, it makes little sense to limit your ability to sell by limiting your markets but… to     each their own.

Price- This section is an interesting section to dig into. The pricing of your book can dramatically affect the sales of your book. There are also some Amazon set constraints. In most cases your book can not be set as “free” (although there are ways around this).  If you are publishing your own original content/ journal or low content book you will need to decide at what price it will sell the best. The easiest way to do this is just with some super simple “market research”. As in, search for “like” offerings on Amazon and see what they are selling for. As with almost everything else in KDP you can go back and change it after your book is approved so don’t stress too much over this.

If you want to allow lending- Lending allows the purchaser to share your book for up to 48 hours. This option is a recommended option by Amazon.

At this point your book is ready to publish! All you have to do is click on the publish button. Once you have clicked “publish”, just go back to your “Bookshelf”. 

See below for the visual!

At this point all you are doing is waiting. Your book will initially be “In Review”. It can take up to 72 hours, on average, for your new ebook to go into “Live” status in KDP. There is a step in between “In Review” and “Live” and it is “Publishing”. This step generally takes just a few hours at most and unless you are constantly checking in on it you will normally not even see this step. Your book is ready for people to purchase once it is in the “Live” stage.
You can choose to create a paperback version of your book once your ebook is in the review phase or later. If you are interested in creating a paperback version of your book click here insert link for How to Paperback Version for a detailed explanation of how to do it!

Don’t forget to join our community of amazing like minded people over on our Facebook page. Hop on the Facebook Weirdmoneyco train… CLICK HERE to join! 

Categories
Amazon Amazon KDP

Top 5 Questions About Publishing on Amazon

Self Publishing on Amazon (A.K.A- KDP)

Does it cost me anything to publish on Amazon?

The technical answer is that your only initial investment is time. The answer is the same no matter if you are publishing your own original work or a public domain work.  That being said, you will pay a fee from Amazon when your book sells. If you are publishing a physical version of your book (non-ebook) by utilizing Amazon’s POD printing service there is also a printing charge. The printing and distribution fees are automatically calculated by Amazon and subtracted from your displayed profits. On the upside, you will know upfront how much you stand to profit by selling your work at the price that you have chosen to sell it for.

Can I only make/sell ebooks on KDP?

Not at all! Currently you are able to publish ebooks and physical copies directly on Amazon’s KDP platform. The KDP platform is an all-in-one platform for these two versions. It is a fairly intuitive program, even for beginners and “non tech” people like myself. 

Aside from ebooks and physical copies you can also publish audio versions to Amazon. The preferred method for producing an audio version of a book is by usinging ACX.com. ACX is a run through Audible.com which is a subsidiary of Amazon.com. When you produce an audio version of your chosen work through ACX it will be distributed on Amazon, Audible and iTunes. The upside is that the ACX platform is available for authors, narrators and publishers so there are multiple opportunities to “get into” audio versions.                                                                                                      

To learn how to publish ebooks on Kindle Direct Publishing (A.K.A KDP) CLICK HERE.

The learn how to publish paperbacks on Amazon CLICK HERE.

This is the link Amazon offers to authors looking to create an audiobook. It will take you directly to the website for ACX.com.                                                                                

If I publish on Amazon can I still publish on other sites?

You can publish your work on other sites without any repercussions unless you have enrolled your work in their KDP Select program. Amazon’s KDP Select program is an exclusivity contract that lasts for 90 days. During this timeframe you are not allowed to distribute your work in digital format on any other platform. This means, however, that you can still distribute it in physical form even while enrolled in this program.

What is KDP Select and why would I enroll in it?

By enrolling the digital rights of your work in KDP Select you will 70% royalties on your work and will also get a small percentage share of the KDP Select Global Fund. This percentage is formulaic in its payout. On Amazon’s website it is described below. Here is a link to Amazon’s royalty page. The average payout per page read is generally around ½ cent per page. The total can vary depending on the total number of pages read each month by readers who are enrolled in Kindle Unlimited.

             Excerpt from the page…

For example, here’s how we’d calculate royalty payout if $10 million in funds were available in a given month with 100 million total pages read (Note: Actual payouts vary and may be less; check your Prior Month’s Royalty Report to see your earnings):

Author with a 100 page book that was borrowed and read completely 100 times would earn $1,000 ($10 million multiplied by 10,000 pages for this author divided by 100,000,000 total pages).

Author of a 200 page book that was borrowed and read completely 100 times would earn $2,000 ($10 million multiplied by 20,000 pages for this author divided by 100,000,000 total pages).

Author of a 200 page book that was borrowed 100 times but only read halfway through on average would earn $1,000 ($10 million multiplied by 10,000 pages for this author divided by 100,000,000 total pages).

This means that the more popular and engaging your books are the more you can make! On the downside, as stated before, you are restricted to distributing the digital format of your work only on Amazon for as long as it is enrolled in KDP select (Minimum of 90 days).

How much money can I make per book?

As far as straight royalties go you have the choice to choose 35% or 70% royalties through KDP.

You may ask… “Why in the heck would I not want to choose to get 70% royalties?”. As with most other things in life there are “catches”.

There are 6 primary terms in which you will need to agree to be allowed to choose the 70% royalty option.

  1. It can not be a public domain work. What is a public domain work? CLICK HERE to find out more about publishing public domain works.
  2. You must agree to allow lending for your book. This is a one time 14 day lending that the purchaser is allowed to make.
  3. The price of your book must be between $2.99 and $9.99. There are exceptions to this but they are not available to self publishers.
  4. You only actually get 70% in the US and most European Countries. In the other territories you will still only get 35%. There is a small caveat to this detailed in E.
  5. You can also receive the 70% royalty in Brazil, India, Japan and Mexico if you enroll your work in KDP Select.
  6. Probably, in my opinion, the most odd of the terms to get your 70% royalty is the transfer charge. In short you get charged per megabyte to transfer your book to the purchaser. If your book is 20 megabytes and the purchaser is in the US (it is about $.15 per megabyte in the US) then you would have $3.00 subtracted from your total royalty. Below is a chart with the transfer prices by country market.

If your answer is no to any of these terms than your royalty will be 35%.

I hope this information helps. For more information on KDP and other business development ideas and answers join the community on Facebook and get on the WeirdMoney Train!

Categories
Big Rich Builds Big Rich Builds Business

Making Money on Amazon: Not how you expect

I have been looking at trying to make money on Amazon for quite some time. Below I’ll share the top 5 ways to make money on Amazon in 2020 from people I personally know.

Stick around because there’s also a reason that I decided to NOT pursue any of them (and what I decided to do instead on Amazon that is making me money every month).

Like any good netizen, I started by googling things like “How do you make money on Amazon?” or “What to sell on Amazon?”. Gotta start somewhere!

What I found was a ton of lists that gave me the TOP 10, 15, 20 or more of things to source, buy, sell, create…. Yikes. Where do you start when you have 20+ options? Sometimes the problem is not enough options – it’s TO MUCH.

Narrowing down opportunity is something that stops most first time entrepreneurs. You have so many great choices it ends up taking so much time and energy researching, comparing, and thinking about them all that you might go months or years without making progress.

While they all gave me some interesting ideas to chase down, none of ideas from these lists seemed to be just what I was looking for and most of them seemed rather… generic.

Looks, generic is not a bad thing! Generic asprin that costs half the price? Yes please! Generic ideas on a list that is suppose to inspire me to develop material, invest time, deploy resources just… well. Did anyone vet these ideas? Were they just spitballing ideas around the table or were these markets tested?

*quick note*: I found one resource that was FREE and really took a more in depth look at realistic options with examples. If you folks haven’t checked out Nick Loper at Side Hustle Nation you need to!  His article is specifically about Amazon FBA opportunities and gave me some great areas of opportunity to look into but I still had not made up my mind.

So….what was I looking for? To many options from generic lists to distract me and solid ideas to excite me.

I did what I’ve learned is the smartest thing to do when I’m noodling on a new problem or have a question about starting, growing, or managing something I’m working on – I ask my community!

After polling our Weird Money Co community here is my list!

I know, I know, I know another Top blah blah blah list

Now, bear with me!

This list of opportunities on Amazon is not one of those “put as many ideas as possible” kind of lists (although we did post that list in case you want to check it out – Biggest List of Opportunities to Make Money with Amazon [Updated 2020]).

No, no my friends! This list are ways that REAL people I’ve talked to are using Amazon TODAY to make money.

Top 5 Ways Real People made money on Amazon

Below I have listed my Top 5 (I have also linked some of their favorite tools or sites that they use for their side hustle so you can see from the source what tools they are using).

For the first four options, you will need a sellers account set up and verified on Amazon.

1) I’ve known the Kettechman brothers for a long time and they have sold products on Amazon (and Ebay) that they bought, mostly from overseas, in bulk and sold at a markup.  Classic wholesale play – buy from one source and sell somewhere else. AliExpress Kole Imports Jungle Scout

2) A friend of mine, Michelle, in New Orleans buys white labled products through white labeling companies to build upon their own “brand” of health products. White labeling is where you buy a product (similar to #1 above), and then add your own spin on it. You might add your own branding, packaging, decorations, instructions and more. Jungle Scout

3) Book flipping was a new idea to me and Toni Zees has been at it for years. She buy books (mostly non-fiction) at thrift stores and flea markets and resells them on Amazon for  a profit. Being able to quickly check the price of books to determine if there is enough profit margin built in before you actually purchase it is important, so check out Bqool, Sellics and ScoutIQ. Once you are ready to go and you start to build your inventory you should look into Amazon FBA.

4) A fellow hands-on handy buddy of mine, Rich Bradburns, assembles and/ or installs products that were sold on Amazon. He makes pretty good money doing this and only spends a few hours a week. Amazon Installation Service

5) A great friend of mine, Nathan Van Coops, has had an entire series of fiction books published that are being sold on Amazon (in addition to many other outlets). See the link below to check them out!

6) What I ended up selecting and have been profitable with wasn’t brought up even once! The magic #6 that required 2 hours each week with NO up front money involved.

These were my top options that I decided that I wanted to look into further to see if they were something that I wanted to invest my “side hustle” time. 

And then….. I said no to all of them.

Why I decided to not go with any of the Top 5

Below is a break down my thoughts on each one of the options and why I decided they were not for me at the moment. All of these are still on my radar and I think they make a lot of sense, but for one reason or another that I share below, I decided it wasn’t the right time.

1) Buying products in bulk or just direct from overseas manufacturers and reselling them in the US, also known as drop shipping, is something I have been interested in for quite a while and is on my personal list to dive into more in the near future.

That being said, like many people, I was furloughed from my company because of the pandemic. I didn’t want to tie up my meager savings in holding inventory (if I was to buy in bulk) or in costly fees and advertising.

2) The white label option follows along the same line of thought as the first option. On top of that I didn’t have a brand (Yet!) that I was going to be able to use the white labeling to build on.

3) I was a little concerned about how long it would take for a book I sent to Amazon to be sold. I had to purchase the book and pay for shipping to send it to Amazon. What if it took 6 months or a year to sell? The time cost of that money had to be taken into account. I’m working out how to at least attempt to gauge how long of a lead time the books would need.

I was looking for something that, when things return to “normal”, I could continue building while still allowing me to go back to my full time job. My full time job affords me time to work on side projects but most of the available time is at random times of the day and often in different cities while traveling. This might still be an option I return to because I do travel regularly between 5 cities perhaps I could swing through book stores once or twice a month?

4) Such a cool idea and one that you can get into without spending ANY money at all! I definitely have the skills needed for this idea, but this idea falls to the same fate as #3 – , I am looking for something that I can continue to grow when we are all released from the invisible clutches of the current pandemic.

Something that is applicable only because of the pandemic to note: my buddy said that he has seen a significant drop in business because of social distancing which make it harder for him to actually show up to someone’s home!

5) I’m not a book author. Not yet at least. While I may write a lot of guides and blogs, I’m not quite ready to make the leap to full length book. Therefore this one is auomatialy a “NO”, right?

Yes it was initially discounted but it lead me to an interesting option #6. 

What is this mythical option #6 you may ask? 

Publishing someone else’s books on Amazon of course! 

Sounds unethical and “sketchy” right?

It is not either of them, I promise!

Kindle Direct Publishing, also known as KDP is the Amazon program I worked through.

I wrote an in depth guide on KDP and how I actually went from zero experience selling on Amazon or with publishing books, to having a top 100 ranked children’s book with NO money out of pocket.

Since THIS post is not THAT post, here is the Short and Sweet Version

Short and Sweet: Publishing an open domain ebook on KDP

  1. Download an open domain book from one of the available sites.
  2. Decide how you are going to differentiate your book from the others that may be offered for free (annotate, illustrate or translate).
  3. Download and utilize Kindle Create to edit and format your book. To learn how to use Kindle Create to format your book/ ebook for the Amazon market place CLICK HERE.
  4. Log into your KDP account and follow the steps through the three pages.

Note: It can take up to 72 hours for a book to go from “Submitted” to “Published”

  1. Once you have completed your ebook, you can now choose to complete the steps to publish your version of your chosen book in a paperback version. If you are interested in learning how to publish a paperback version of your book CLICK HERE.
  2. Track your sales!
  3. When you find a book that is selling well for you; think about promoting it.

Statistics

Some information that helped me decide where to publish the public domain books (and other books when I complete me first original book)

Authors say that Amazon accounts for about 85% of their sales

I can share some statistics of my own, such as the time I’ve invested into each book, sales fluctuations and what not if there is any interest.

What about you? Have you published anything on Amazon? Have you published a book you wrote and moved it online?

We hope this information helps. For more information on this and other business development ideas and answers join the community on Facebook and get on the WeirdMoney Train!